Showing posts with label girl time. Show all posts

Wednesday, July 27, 2011

Easy Stretchy Friendship Bracelets

These are really easy & fun to make! My girls love them & they can even do it themselves. Wear them, stack them, make some for every outfit :).....so fun!


You need: MICROFIBER girls tights.  Try to find the biggest you can, Girls 14-16 or ladies Queen size will usually do.  The larger the tights the bigger your bracelet will be able to be.  (I used girls 14-1 or Ladies Queen for these kid bracelets) Sometimes it's hard to find very many colors at your local store, so you can dye your own white ones with RIT Dye or find some online like here . That is just one example of some assorted colors you could get.

Take the tights, cut off the top and the toe.  A rotary cutter makes this process smooth and easy, but scissors will do just fine too.
Cut your tights in strips of about an inch width
 Once you have your strips, just stretch them out and the tights will roll up making a bracelet looking thing :)
You could use this piece for other things like a choker or bracelet with an attached pendant or something. Get those brainstorms brewing....could be lots of possibilities with these little babies. :)
But, for these bracelets we are going to cut them so they are one long piece.  
You will cut 3 and hold them together and tie a knot in one end.
I like to use a clipboard to hold in place while I braid.
Braid like you would a normal braid.  It's more fun with 3 different colors, but this is what I used for this tutorial. 
 Braid down for as long as you want your bracelets and tie another knot in the end.
Tie a tight braid or loose braid depending on the look you want. You can even try 4 strips of different colors.

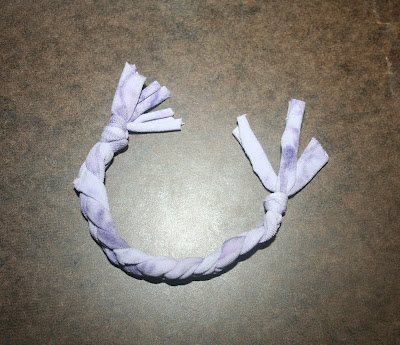
You have 3 little pieces on each end. You will now tie each of those 3 pieces using a square knot to the other 3 pieces on the other end.  (tie 3 Separate knots)
You can trim up the ends all the way or leave a little of the frilly stuff for fun. My girls like the frilly stuff, but for my boys I would probably cut them down. :) and I would use very boyish colors of course! ;)
There you have it! 
If they stretch out too much after lots of wear you can simply put them in cold water and let dry and they should be back to normal again.


My girls like making these because they can do it too (I help them with the knots) & they are so proud of their creation.
They are comfortable to wear, they are stretchy, they are soft, They are fun!!

I hope you enjoy!! Let me know if you try it!


Partying with:
Creations by Kara

Craft Junkie Too Friend

Monday, July 25, 2011

Glitter Nails Tutorial

My girls and I had a lot of fun doing our Glitter Nails!! It's pretty simple & very fun for a girly DIY project.  I helped my girls out, they would probably make more of a mess with the glitter than I did. This makes for a fun night with your girls or girly b-day party idea.  My girls are 6 and 8 (well almost....7 more days) :) and they loved it! So did I :)
You'll need any kind of coordinating nail polish, glitter and a clear top coat polish, {paper towels, Q-tips, polish remover, and a small craft paint brush will also come in handy}You can get all this at your local Walmart.
I tried a bigger grain type glitter and a small glitter, I think I like the small grains of glitter better, my toes have the bigger grains of glitter. Glitter is so fun, so many colors to choose from :) I'm such a girly girly at heart! :)

All you do is:
1- paint the nails with polish
2- pour on the glitter before the polish dries, cover the nails with glitter or put just a little to let the underneath polish shine through, your choice.
3- pat down gently on the glitter after it has set for a few seconds
4-You can shake the excess glitter off or even brush it off with a small craft brush.
 My toes are pretty much covered with glitter :) (Make sure you have a paper towel or pan or something underneath to clean up the glitter easily.) 
5- After it has dried completely and any excess glitter is brushed off, put a Clear Top Coat of Polish on.  Let Dry and there you have it!
I did my nails a little different, I did my own DIY french manicure just painting the tips with white (I used "Pure Ice" brand nail polish, color: platinum.) then I put a little bit of silver glitter before the polish dried.  After that I dipped a pointy tip Q-tip in polish remover and straightened up my white line to make it look better.  Check out this tutorial for more about that part.  After the white dried I brushed off any excess glitter & put a top coat of Clear Polish. Ta Dah! All done.  My "Do it Myself" French glitter manicure. I think it turned out pretty good.  

My girls chose Gold glitter and Purple glitter.  So Fun!!
Enjoy some cute glitter nails for the rest of the Summer! Let me know how you like it & if you try it out! Come back Wednesday for another FUN Tutorial *wink wink*

Partying with:

The DIY Show OffSumo's Sweet Stuff


Tip Junkie handmade projectsCreations by Kara
Craft Junkie Too Friend

LinkWithin

Related Posts Plugin for WordPress, Blogger...

Natural supplements

Brain Balance

Search This Blog

Hint Water

Fit MaMa WannaBe on Facebook

a POPSUGAR Select Fitness Founding Member

Sweat Pink!


Fit Mama WannaBe


To show support please leave comments, questions, feedback and you can follow via Google Friend Connect, Networked Blogs, Bloglovin', Pinterest, Instagram, Twitter and Facebook.

Follow this blog with bloglovin

Follow Fit Mama WannaBe
Thoughts in Vinyl Blog Button

I want to hear your story.....

If you have a Weight-loss or Fitness or any other motivational type Story, I would love to feature you on my blog. Please email me at sparklesandbugs {at} hotmail.com


Follow Me on Pinterest

Copyrighted

Please don't use any picture or ideas from this blog without proper attribution. Thanks a bunch!
 
Designed by Munchkin Land Designs • Copyright 2012 • All Rights Reserved